Saturday, November 17, 2018

Parallel RLC Circuit Step Response

Purpose: 
Pre-lab:
This lab is similar to the previous lab except it is constructed in PARALLEL with an extra Resistor. 
In this case, we combined R1 and R2 into an equivalent R.


In this case, we also found that ω>α -> underdamped case.
For theoretical period T, we got 0.6433ms and experimental period T based on the graph below, period T=0.6273ms.
Finally, here is the picture of our circuit

Series RLC Circuit Step Response

Purpose: 
Pre-lab:
With the circuit provided above and we calculated the V(out)/V(in)
As we calculated: α < ω (631.068 < 85438.884), and that gave us the UNDERDAMP case. The V_in provided by Digital Analog was 5V, and at steady state, we measured V(infinity)=5.04V. The ratio of V_out/V_in = 1.008. Based on information given in lab, we calculated our period T=4ms
Picture of our steady state.


Graph of an underdamped case.
Here is a picture of our circuit.


Saturday, November 10, 2018

Passive RL Circuit Natural Response

Purpose:
Prelab: 
The requirement of this lab is almost similar to the previous lab which is RC Circuit Natural Response.
We calculate V(t) of Inductor at t>0 and then calculate the value of Tau theoretically and experimentally.
The i_L(t) = 0.05e^(-t/Tau), theoretical Tau = L/R2 = 2.128 x 10^(-5) s.
Then value of V_L(t) can be calculated by Ldi/dt. V_L(t)= (-0.05/(2.128x10^(-5)))e^(-t/Tau)
We use the same method as previous lab which is choosing V1,V2 and delta t to find experimental Tau.
The value of experimental Tau = 2.017 x 10^(-5) s
%Diff= 5.5 %
In this experiment, the time constant Tau is L/R, but R is only R2 since we unplug R1.
Here is the picture of our result by using Digital Analog.

Passive RC Circuit Natural Response

Purpose:
Prelab:
We constructed the circuit above, and calculate value of Vc(t), Tau at t>0
Value of Vc(0) = 3.221V through Vc(t) = 3.221e ^(-t/Tau)
Our theoretical value of Tau is 0.04752s compared to experimental value of Tau is 0.0491s
% Diff  = 3.21%
We find the value of experimental value of Tau by choosing value of V1 = 3.221V and V2=1.005V, then record their delta t and plug in to the equation of Vc(t) to find Tau.

Here is the picture of our circuit constructed.
This makes sense because when we unplug (like a switch in the description of the lab), V of capacitor drops down exponentially to 0.


Thursday, October 18, 2018

Leakage Currents and Electrolytic Capacitors

Purpose:
We will construct a circuit like picture below:
The polarity of the electrolytic capacitor is important, it is not symmetric like other capacitors. When we change the polarity, the behavior of capacitor can be changed as such. The longer lead will be anode(+), and the shorter lead will be cathode(-). 
We also use R=100Ω, C=10μF connected in series, and power supply will be 5V. We will "disconnect" and "reconnect" the power supply to observe the behavior of capacitor when charging and uncharging. 

Tau = RC= 100 * 10 * 10^(-6) = 0.001s
In order to fully charged, it will take 5T = 0.005s. In our experiment, time for capacitor to be fully charged happened quickly as well.

But when it comes to discharging, our experiment result was completely off. The reason for that would be the huge internal resistance in the circuit. Since we learned that the leakage happen when value of resistor should be around 500MΩ while we only have 100Ω

Here is the picture of our circuit.

Saturday, October 13, 2018

Capacitor Voltage-Current Relations

Purpose: In this lab, we will measure the voltage and current across a capacitor to see the relationship between them.
Pre-lab:
By measuring the voltage across the capacitor, we can easily calculate the current across it by using: Ic=Vr/R since resistor and capacitor are connected in series, so they have the same current pass through.


 Triangular of Vr and Vc
 Sinusoidal of Vr and Vc
 Picture of our circuit.
Triangular of Vr and Vc


Saturday, October 6, 2018

Summing Amplifier

Purpose:
Pre-lab: Calculate Vout based on 2 Vins (Va and Vb) with Vb=1, Va=-4,-2,-1,0,1,2,3 and 5V.
R1=1.77kΩ, R2=1.19kΩ, R3=1.29kΩ


At 5V, it reaches saturation because value of Vexp vs Vtheo is off. 

Inverting Voltage Amplifier

Purpose:
Pre-lab: Based on the circuit constructed below:

We changed the value of Vin from -3V to 4V with the increment of 0.5V, and find Vout. Since this is an inverting voltage amplifier, we have value voltages from -3V to 3V symmetrical with. Vout on the left column is Vout eperimental, and on the right column is Vout theoretical. 
When it reaches saturation, we will not get the Vout experimental the same as Vout theoretical. Vcc+ and Vcc- are controlling the max value of V output in Op-amp.

Here are pictures of out circuit.

Graph of Vout vs Vin
In this graph also represents exactly the saturation and linear region as we discussed in class.

Saturday, September 22, 2018

Thevenin's Theorem

Purpose: 
Pre-lab: Based on Thevenin's Theorem, we calculate Vth, Rth for the circuit belove
Based on the actual value of our resistors, we found Voc=0.437V, Rth= 7.4k Ω. Then we calculated I=3.6116 x 10^-5 A, Vload(4.7kΩ)=0.1697V

When we constructed the circuit and measured value of Rth =7.33kΩ, Vth=0.1707V 

 This is the value of Vload when we connected Rload with Rth, Vload = 0.1781V
In conclusion, there is only a small difference (4.7%) in voltage of Rload (0.1781V vs 0.1697V) when constructing a circuit with a bunch of resistors and the circuit with Rth connect with Rload in series.

Saturday, September 15, 2018

Dusk-to-Dawn-Light

Purpose:


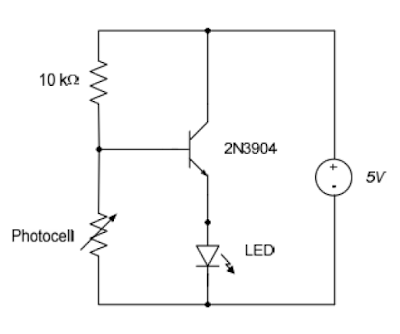
Pre-lab: We construct a circuit belove.
The picture of our circuit constructed with photocell, resistor, power sources, and transistor. 


This picture shows the value of the current when the photocell is not covered 
This picture shows the value of the current when the photocell is covered 
Here is the video, but we cannot clearly see between low and high light level since we turned of the light in the room. If we left the light in the room on, we could see clearly that the LED will brighter when we cover the photocell, and vice versa.